GA4 Setup Guide 2026: How to Create a Google Analytics Account and Connect It to Any Website
GA4 Setup Guide 2026: How to Create a Google Analytics Account and Connect It to Any Website
Tell us about your goals, challenges, and vision. Our experts will help you identify the right digital strategy to grow your business and achieve measurable results.
Posted By
Pooja
Posted Date
15 July, 2026
Share:
Every website owner eventually asks the same question: “Is my website actually working?”
You can guess based on how busy your inbox feels, or you can know — by looking at real numbers. That’s what Google Analytics 4 (GA4) gives you: a live, free record of who visits your site, where they came from, and what they do once they land.
The problem is that Google’s own setup flow is scattered across several screens, and most tutorials only cover WordPress. This guide is different. It walks you through GA4 setup from zero — no prior experience needed — and covers every major platform: WordPress, Shopify, Wix, Squarespace, and custom-coded websites. By the end, you’ll have a working GA4 property, verified tracking, and a checklist to make sure nothing was missed.
What You’ll Learn
1. What GA4 is and why it matters in 2026
2. Before-you-start checklist
3. Step-by-step: Creating your GA4 account and property
4. Step-by-step: Connecting GA4 to your website (every major platform)
5. How to verify tracking is actually working
6. Common setup mistakes that quietly ruin your data
7. FAQs
What Is GA4, and Why Does It Matter?
GA4 (Google Analytics 4) is the current version of Google’s free web analytics platform. It replaced the older Universal Analytics in 2023, and it works differently under the hood — it tracks events (clicks, scrolls, form submissions, purchases) rather than just pageviews, which gives you a far more accurate picture of actual user behavior.
Here’s what a properly configured GA4 setup tells you:
Where your traffic actually comes from — organic search, paid ads, social, referrals, or direct visits
What people do on your site — which pages they read, where they click, and where they drop off
Which content and campaigns are working — so you can double down on what’s driving results instead of guessing
Where the leaks are — high-traffic pages with no conversions, broken funnels, or pages people abandon instantly
Skip this setup, and every marketing decision you make is a guess. With it, you get a factual answer.
Before You Start: What You’ll Need
A Google or Gmail account (free to create if you don’t have one)
Admin access to your website (WordPress dashboard, Shopify admin, Wix editor, or your site’s code/hosting)
About 10–15 minutes
That’s it — no credit card, no paid tools, no developer required for most platforms.
Part 1: Create Your Google Analytics Account and Property
Step 1: Go to Google Analytics
Visitanalytics.google.com and sign in with your Google account. If you’re setting up Analytics for the first time, click Start measuring.
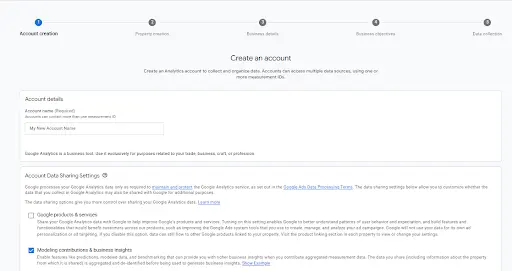
Step 2: Set Up Your Account
Google organizes GA4 in a hierarchy: Account → Property → Data Stream. Think of the account as your company or organization, and the property as the specific website (or app) you’re tracking.
Enter an Account name — usually your company or website name
Review the data-sharing settings (these control what Google can use your data for) and adjust them to your comfort level
Click Next
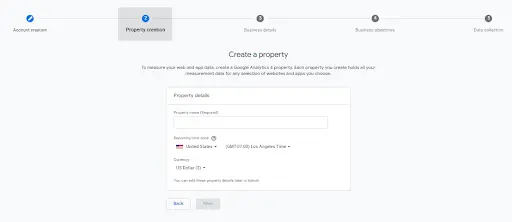
Step 3: Create Your Property
Enter a Property name (e.g., “Nettechnocrats Website”)
Select your reporting time zone and currency — get this right the first time, since it affects how your data is calculated later
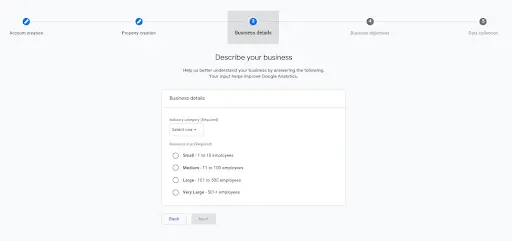
Click Next, then fill in your industry category and business size
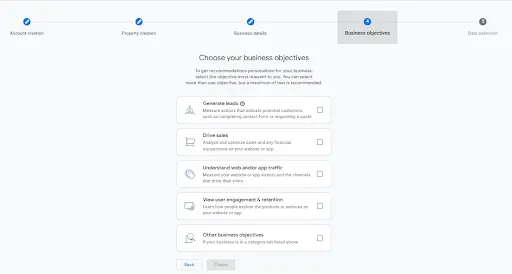
Choose your business objectives (selecting “Get baseline reports” gives you full access to standard GA4 reports right away)
Click Create and accept the Terms of Service
Step 4: Set Up a Data Stream
A data stream is what actually connects GA4 to your website.
Choose Web as your platform
Enter your website URL and give the stream a name
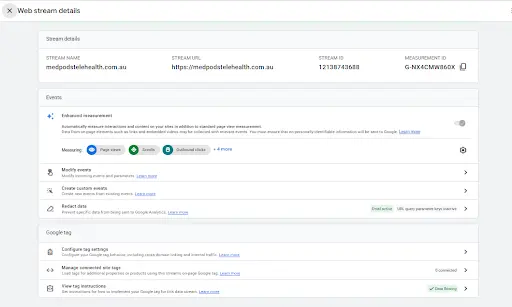
Leave Enhanced measurement turned on — this automatically tracks scrolls, outbound clicks, site search, and video engagement without any extra setup
Click Create stream
You’ll land on a screen showing your Stream name, Stream URL, and — most importantly — your Measurement ID, formatted like G-XXXXXXXXXX. Copy this ID somewhere safe. You’ll need it in the next step.
Part 2: Connect GA4 to Your Website
This is the step most guides gloss over. The right method depends entirely on what platform your site runs on — pick the one that matches yours.
Important: Only use one tracking method per site. Installing GA4 twice (e.g., through a plugin and manually in your theme) will double-count your traffic and quietly wreck your data.
Option A: WordPress
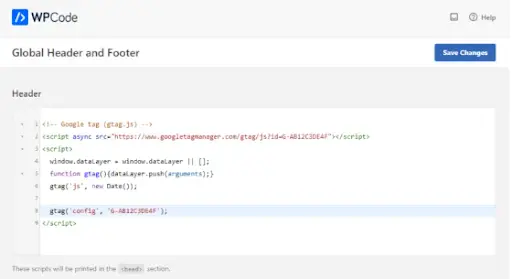
The cleanest way to add GA4 to WordPress without touching code is through a header/footer plugin:
From your WordPress dashboard, go to Plugins → Add New
Search for a header/footer code plugin (e.g., WPCode), install and activate it
Go to Code Snippets → Header & Footer
Paste your GA4 tracking snippet (found under Admin → Data Streams → your stream → View tag instructions → Install manually) into the Header section
Save changes
If you’d rather avoid plugins entirely, you can paste the same snippet directly into your theme’s header.php file, right after the opening <body> tag — just know that a theme update or switch can wipe it out, so this route needs a bit more maintenance.
Option B: Shopify
From your Shopify admin, go to Online Store → Themes
Click Edit code on your active theme
Open theme.liquid
Paste your GA4 tracking snippet just before the closing </head> tag
Save
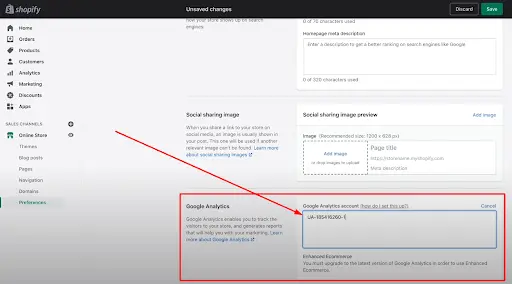
Alternatively, Shopify also supports adding GA4 through Online Store → Preferences, depending on your theme and plan.
Option C: Wix
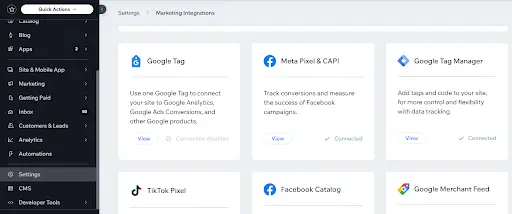
Go to your Wix dashboard and open Settings → Custom Code (or Marketing & SEO → Marketing Integrations, depending on your Wix version)
Add a new custom code snippet, paste your GA4 tag, and set it to load on all pages, in the Head section
Apply and publish
Option D: Squarespace
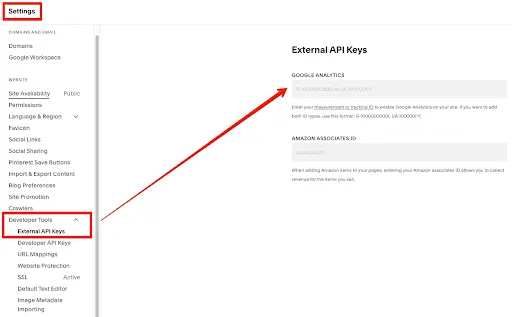
Go to Squarespace Settings → Advanced → Code Injection
Paste your GA4 snippet into the Header field
Save
Option E: Custom-Coded or Developer-Built Websites
Paste the GA4 tracking snippet directly before the closing </head> tag in your site’s base HTML template, so it loads on every page.
Option F: Using Google Tag Manager (Any Platform)
If you’re already using Google Tag Manager (GTM) — or plan to manage multiple tracking tags long-term — this is the more scalable route:
Install the two GTM code snippets it gives you (one in the <head>, one right after the opening <body>)
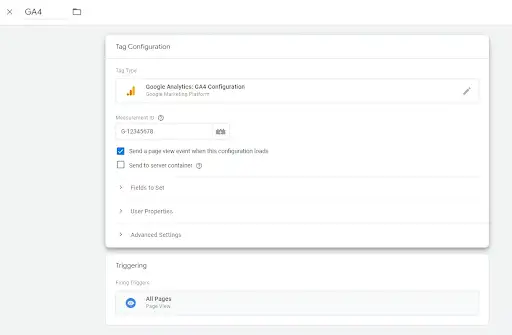
Inside GTM, create a new GA4 Configuration tag, enter your Measurement ID, and set the trigger to All Pages
Publish the container
GTM adds a layer of setup, but it pays off once you start adding conversion tracking, form tracking, or ad pixels — you manage everything from one dashboard instead of editing code every time.
Part 3: Verify Your Tracking Is Actually Working
Don’t skip this — a “successful” install with no verification is how silent tracking failures happen.
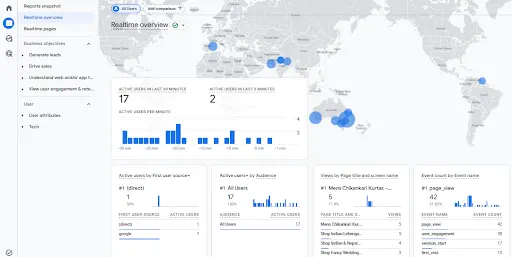
Go to Reports → Realtime in your GA4 property
Open your website in a new tab and click around for a minute
You should see your own visit appear in the Realtime report within a minute or two
If nothing shows up after 15–30 minutes:
Check for a caching plugin or CDN setting that might be stripping out custom header code
Disable ad blockers while testing — they frequently block analytics scripts
Double-check the Measurement ID matches exactly (a single typo breaks the whole connection)
Confirm the snippet is placed in the <head>, not the <body>, unless your platform specifically instructs otherwise
Full standard reports (sessions, users, traffic sources) can take 24–48 hours to populate completely — Realtime is just for confirming the connection works.
Common GA4 Setup Mistakes to Avoid
Installing tracking twice — through both a plugin and manual code, causing inflated numbers
Wrong time zone or currency — set during property creation and hard to fully correct later
Ignoring internal traffic — your own visits and your team’s inflate your data unless you filter internal IPs
Never checking Realtime after setup — the single fastest way to catch a broken install early
Turning off Enhanced Measurement — you lose scroll, click, and engagement tracking for no reason
Setup Is Just the Starting Line
Getting GA4 installed correctly is step one. The real value shows up once you know how to read the reports, set up conversion tracking, and turn that data into decisions that actually move traffic and revenue.
That’s the part most beginner guides skip — and it’s where a lot of businesses end up with a GA4 account full of data they never actually use.
If you’d rather have this handled properly the first time — account setup, conversion tracking, and a dashboard built around the metrics that matter to your business — Nettechnocrats sets up and manages GA4 as part of our SEO and digital marketing engagements, so the data is ready to drive strategy from day one.
FAQs
Is GA4 free to use?
Yes. The standard version of GA4 is completely free and covers what the vast majority of websites need.
How long does GA4 data take to show up?
Realtime data appears within a minute of a visit. Full reports (sessions, users, conversions) typically take 24–48 hours to fully populate.
Can I install GA4 on any type of website?
Yes — WordPress, Shopify, Wix, Squarespace, and custom-built sites can all run GA4. Only the installation method changes.
What’s the difference between GA4 and Google Tag Manager?
GA4 is the analytics platform that collects and reports your data. Google Tag Manager is a tool for deploying tracking codes — including GA4 — without editing your site’s code every time. You can use GA4 with or without GTM.
Do I need coding skills to set up GA4?
No. Every method above involves copying and pasting a snippet into a specific field — no coding knowledge is required, just following the steps in order.
What is a GA4 Measurement ID?
It’s the unique identifier for your website’s data stream, formatted as G-XXXXXXXXXX. You’ll need it for almost every installation method above.