How to Verify Your Website in Google Search Console – 5 Easy Methods
How to Verify Your Website in Google Search Console – 5 Easy Methods
Tell us about your goals, challenges, and vision. Our experts will help you identify the right digital strategy to grow your business and achieve measurable results.
Posted By
Pooja
Posted Date
01 July, 2026
Share:
So you’ve finally got your site live, or maybe you’re switching agencies and need access to data that’s been sitting there for years without you. Either way, you’ve hit that wall everyone hits: Google wants proof the site is actually yours before it’ll show you a single number. Annoying? A little. Necessary? Also yes.
We deal with this every single week at our Digital Marketing Company, usually for clients who’ve just had a new site built or who are handing SEO duties over to us for the first time. And honestly, most of the confusion isn’t about difficulty, it’s that nobody tells you which of the five methods actually fits your situation. So let’s fix that.
Why bother verifying at all?
Search Console hands over genuinely sensitive stuff, your traffic numbers, which pages Google has indexed, crawl errors, security warnings if your site ever gets hacked. You wouldn’t want a stranger to access that, so Google makes you prove ownership first. Think of it like showing ID before someone hands you the keys to a house.
Once you’re verified, you generally stay verified, no need to repeat the process every month. It only breaks if you remove the verification file, switch hosts without thinking about it, or do a major redesign that wipes your code clean.
Pick your property type first
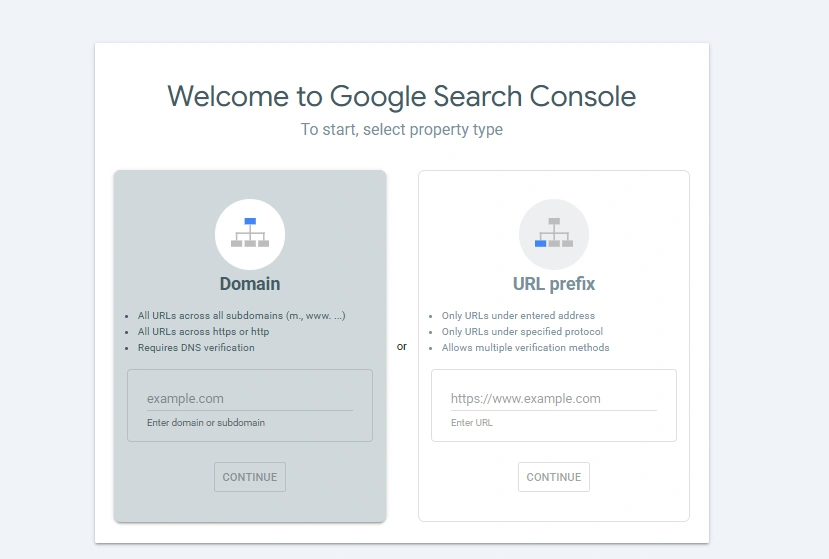
When you add a new property, Google gives you two choices:
Domain property — covers every version of your site (www, non-www, http, https, all subdomains) under one roof. Requires DNS verification, full stop.
URL prefix property — covers the exact URL you type in. More restrictive, but it unlocks all five verification methods below.
If DNS settings make you nervous, just go with URL prefix. You’ll have more options to choose from.
Method 1: Upload the HTML file
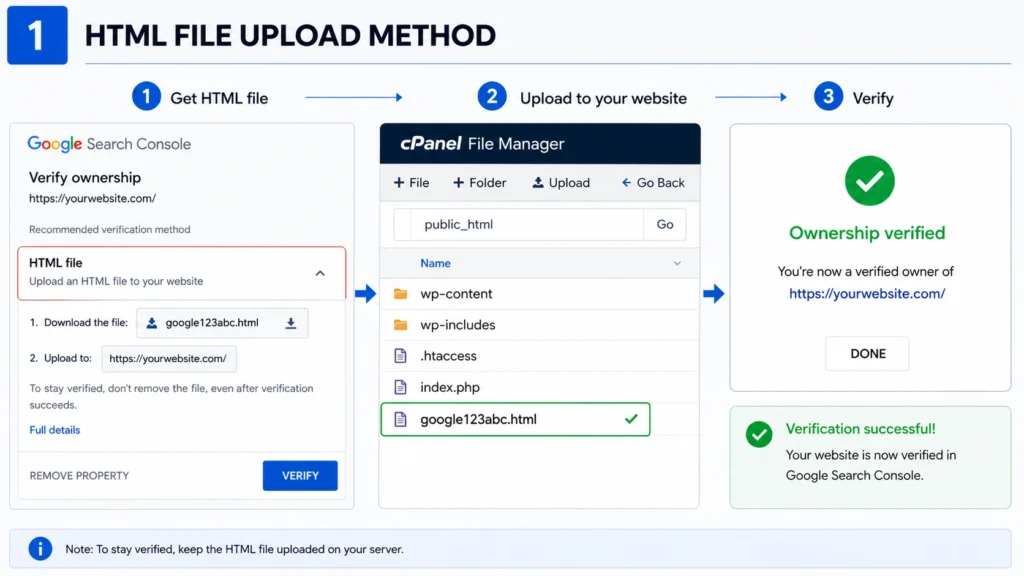
This is the one most people land on first, mainly because it doesn’t require touching any code.
Pick the URL prefix option and type in your site’s address.
Under the HTML file tab, Google gives you a small file to download — something like google123abc.html.
Upload it to your site’s root folder, so it sits at https://www.nettechnocrats.com/google123abc.html — not buried in a subfolder.
Head back to Search Console and hit Verify.
Works great if you’ve got FTP or hosting panel access. One thing people get wrong constantly: they upload the file somewhere like /uploads/ or /assets/ instead of the root. Google won’t find it there, and you’ll just sit staring at an error message wondering what went wrong.
This is also a method we lean on a lot for clients without a developer on standby. If you’re running SEO Services for a small business owner who manages their own hosting account, this is usually the path of least resistance.
Method 2: Drop in the HTML tag
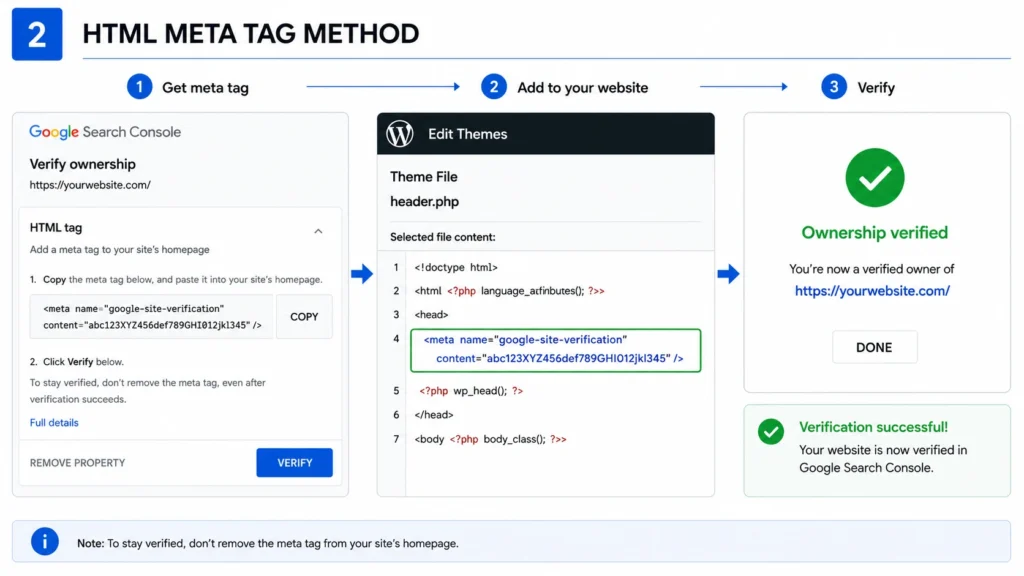
No file uploads here, just a snippet of code that goes into your homepage’s <head> section.
Select HTML tag as your method.
Copy the meta tag Google gives you (it’ll look like <meta name=”google-site-verification” content=”…” />).
Paste it right after the opening <head> tag on your homepage.
Save, publish, then click Verify back in Search Console.
This is the go-to for anyone offering WordPress SEO Services, since most WordPress sites let you edit the header through the theme editor or a plugin without ever opening an FTP client. Yoast, Rank Math, and similar plugins usually have a dedicated field for this exact code, just be careful you paste only the code itself into that field, not the whole <meta> tag wrapper, or it’ll throw an error.
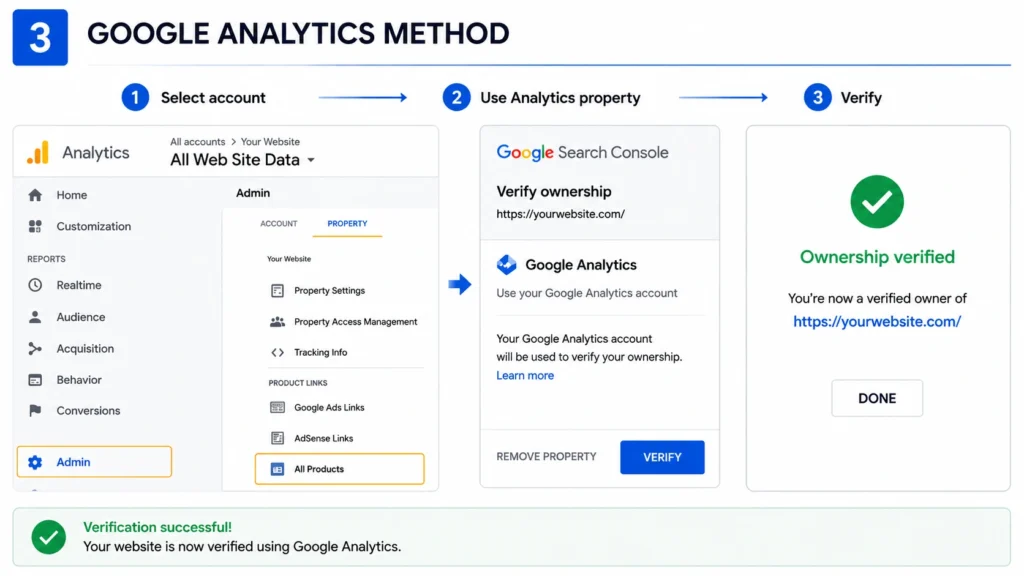
Method 3: Let Google Analytics do the work
If Analytics tracking is already installed correctly, this might be the fastest method on the list, sometimes it’s verified before you even finish reading the instructions.
Choose Google Analytics from the verification options.
Search Console scans for your existing tracking snippet automatically.
Click Verify.
You’ll need Edit access on the Analytics account, and the tracking code has to sit in the <head> section, not buried in the footer or loaded through a third-party tag manager script that Google can’t read directly.
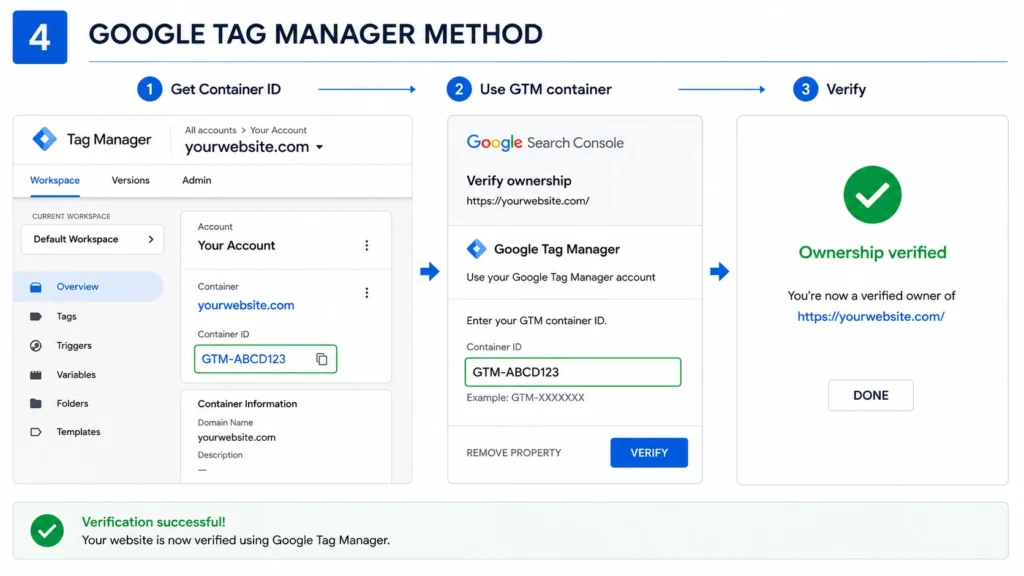
Method 4: Verify through Google Tag Manager
Similar idea, different tool. If your dev team manages scripts through GTM instead of hardcoding them, this saves a step.
Pick Google Tag Manager as your verification method.
Google checks for the container snippet and confirms you’ve got Manage-level permission.
Click Verify.
The thing that trips people up here: the GTM snippet has two parts — one goes in <head>, the other right after the opening <body> tag. If your developer only installed one half (it happens more than you’d think), verification quietly fails and nobody knows why.
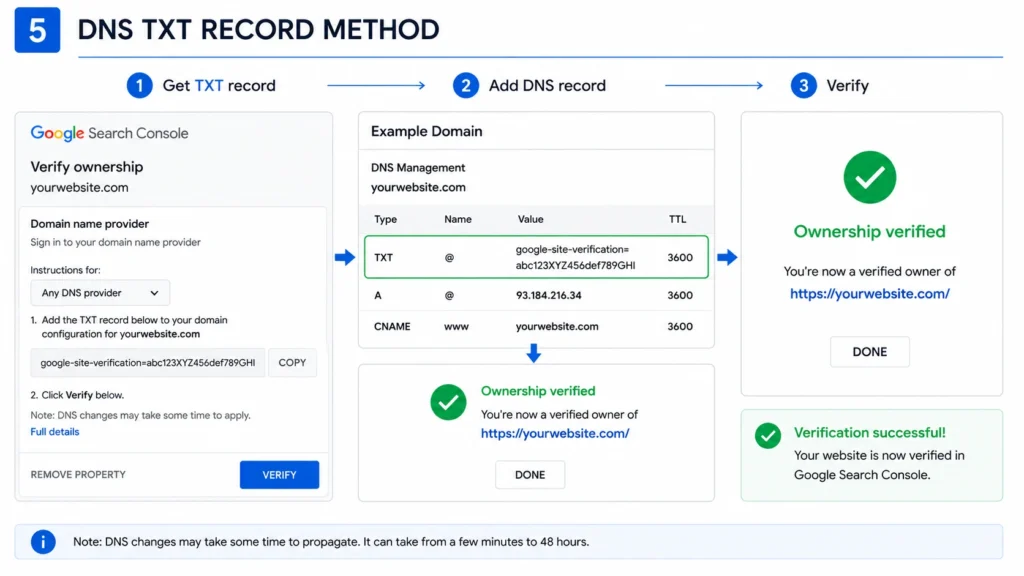
Method 5: DNS verification through your domain provider
This is the heavyweight option — verifies your whole domain in one shot, including subdomains, http and https versions, the works.
Either select the Domain property type from the start, or choose “Domain Name Provider” under other verification methods for a URL prefix property.
Copy the TXT record value Google gives you.
Log into wherever your domain is registered like- GoDaddy, Namecheap, Hostinger, whoever and find the DNS settings.
Add a new TXT record with that value. Leave the host field as @ or blank, depending on what your provider expects.
Save it, head back to Search Console, click Verify.
This is the method we recommend most often when we’re managing multiple subdomains for a client, or when a business runs both a blog and a store under different paths of the same domain. One catch worth knowing upfront: DNS changes don’t happen instantly. Sometimes it’s verified in five minutes, sometimes you’re waiting most of a day for it to propagate. Don’t assume failure just because it doesn’t work on the first try.
It’s also worth mentioning if your site runs on a platform like Wix or Squarespace, DNS verification tends to be the smoothest route, since these platforms don’t always give you direct access to edit the <head> section or upload custom files the way WordPress does. As a Digital Marketing Agency, this is genuinely the method we reach for most often with Wix SEO clients, and the same goes when we’re working for a Squarespace website their built-in domain settings panel makes adding a TXT record fairly painless.
If verification isn’t working
A few things worth checking before you start pulling your hair out:
Are you logged into the right Google account? Easy to miss if you manage several.
Try an incognito window cached versions of your site can throw the check off.
Visit the verification file’s URL directly, or view your page source, to confirm the file or tag is actually live.
For DNS, run a quick check with a tool like MXToolbox to see whether the TXT record has actually propagated yet.
Frequently Asked Questions-
1. Do I have to verify my site again later?
Not unless you remove whatever method you used to verify it in the first place. A site redesign or hosting migration is the most common reason verification quietly breaks.
2. Can more than one person verify the same site?
Yes, you can add multiple users as owners within Search Console, and each can verify independently or be granted access by an existing owner.
3. Will changing my theme or hosting break verification?
It can, if the HTML file or tag method was used and the new setup wipes it out. Always worth checking verification status after a big site change.
4. Which method should I actually pick?
Whichever matches the access you’ve got. DNS is the most durable if you can edit your domain settings. HTML tag is usually easiest for WordPress, Wix, or Squarespace sites where file access is limited.
5. Is this the same thing as setting up Google Analytics?
No, different tools, different jobs. Analytics tracks what visitors do on your site; Search Console shows how Google’s search engine sees and indexes it. Most businesses end up using both.
At the end of the day, verification is a one-time hurdle, not an ongoing chore. Pick the method that fits the access you already have, follow the steps in order, and you’ll have real search data in front of you within minutes whether you’re doing this yourself or it’s something your Digital Marketing Company handles as part of a broader SEO setup.